Do you have external storage like USB drives or portable hard drives? Unfortunately with external storage like USB drives or portable hard drives, your data is totally unprotected and can be accessed by anybody.
What would you do if you lost that device? Some devices come with software you could use, but most of these demand too much trust or might not work on Mac or Linux. Many of these programs are also upsold to you on top of the device you bought.
If you want assurance that you can password protect a device, VeraCrypt is the way to go. VeraCrypt is one of the most reliable ways to guarantee the ability not only encrypt devices, but seamlessly transfer that device’s data to other operating systems.
History
VeraCrypt is a rewritten version of a program called TrueCrypt. Initially for Windows, TrueCrypt was exclusively for Windows users and provided a substitution for Microsoft’s Bitlocker full-disk encryption.
The TrueCrypt developers were anonymous, but seemed genuine in their goals and gave the source code to anyone (we’ll get back to that one later).
But one day, during the height of the Snowden leaks and NSA paranoia, the TrueCrypt website was replaced with big red text demanding their users immediately stop using and uninstall TrueCrypt from their computers.
Enter VeraCrypt, a full rewrite of TrueCrypt. The process was a large undertaking and it was because the source code’s license was very problematic to develop with and to root out the alleged issues.
- The TrueCrypt license does not legally absolve the developers or distributors.
- An audit from Johns Hopkins University in 2015 revealed TrueCrypt is vulnerable to key extraction from live memory. This means if someone gains access to a computer with TrueCrypt turned on, data from volumes could be extracted.
- Another audit by QuarksLabs was completed in October 2016.
- TrueCrypt was for Windows only, although a Linux version was in the works. VeraCrypt is cross platform rewrite for Windows, Mac, and Linux.
The restrictions and lack of legal protection are the reasons most Linux distributions do not package VeraCrypt.
Why Not VeraCrypt?
The first thing you will need to consider is whether VeraCrypt is the right decision for you or not. VeraCrypt is best geared for cross platform file encryption on physical hardware.
Lack of Platform Diversity
If you need to access a file across different devices, for example, Windows and Linux or Linux and Mac, VeraCrypt is good for you.
If you share an encrypted device with somebody who doesn’t use the operating system you use, VeraCrypt will help maintain the encryption of your data while being available across operating systems.
VeraCrypt isn’t good if you only use one operating system or if only you use it. Windows, Mac, and Linux all offer much better integrated solutions (Bitlocker To Go, encrypted APFS, and LUKS respectively) at the cost of platform lock in.
No Official Mobile Clients
VeraCrypt has no official mobile apps. Despite having a page on their website, it is horribly out of date and none of the programs listed are officially by the VeraCrypt team.
A better alternative is Cryptomator. Unlike VeraCrypt, Cryptomator has an official, paid mobile app.
Do not use any mobile app for VeraCrypt. You risk the compromise or loss of data if you do so.
Not Cloud Friendly
Since mobile isn’t supported, this is where end-to-end encrypted cloud storage serves a better purpose. Cloud servers can easily sync to mobile devices more easily while still retaining full encryption at rest. I use Proton Drive personally.
VeraCrypt isn’t a good fit if you use cloud storage. You have to upload a large file with all of your encrypted belongings every time you sync. If that file is 16 GB, you need upload 16 GB each time.
Not to sound like a shill, Cryptomator stores your data is many different encrypted blobs. This way, it’s easier to sync only what gets changed will be synced properly to cloud storage.
I made a video on Cryptomator 2 years ago (Odysee Link).
Installing VeraCrypt
Because of TrueCrypt’s legacy, VeraCrypt is first and foremost a Windows program. You download the installer, verify it, and run it. On Mac and Linux, things get a bit more complicated.
Mac
On Mac, in addition to downloading the installer, you must download macFUSE so macOS can mount external volumes properly.
Linux
On Linux, VeraCrypt comes officially in 3 packages, a Debian/Ubuntu .deb, a Fedora/CentOS/openSUSE .rpm, and a generic tarball installer.
There’s also a third party package in the Arch Linux extra repository, but it’s not officially maintained by the VeraCrypt developers. The reason Arch allows packaging VeraCrypt is because their philosophy doesn’t discriminate against the TrueCrypt license, unlike the vast majority of Linux distributions.
Generic Archive
Unpack the generic archive and run the GUI x64 installer in the terminal.
Fedora Atomic Desktops
If you use Fedora atomic desktops or Universal Blue, you can layer the .rpm with rpm-ostree. Since VeraCrypt is mounting drives, it requires access to your host system and cannot be installed with Distrobox.
Usage
After VeraCrypt is installed, you can choose to use either the GUI or the command line. I’ll focus more on the Windows GUI, since there is more options, but will include the relevant terminal commands to do the same things on Mac and Linux.
Much of this tutorial comes from the VeraCrypt Beginner’s Guide, including the screenshots.
Unfortunately, VeraCrypt’s website looks like it was made at least 10 years ago and could be rewritten to make this information more accessible. There is also little documentation on the command-line options.
Creating a Volume:

sudo veracrypt -t -c
After installing VeraCrypt, click on “Create Volume” to get started. Then you will be presented with 3 options:
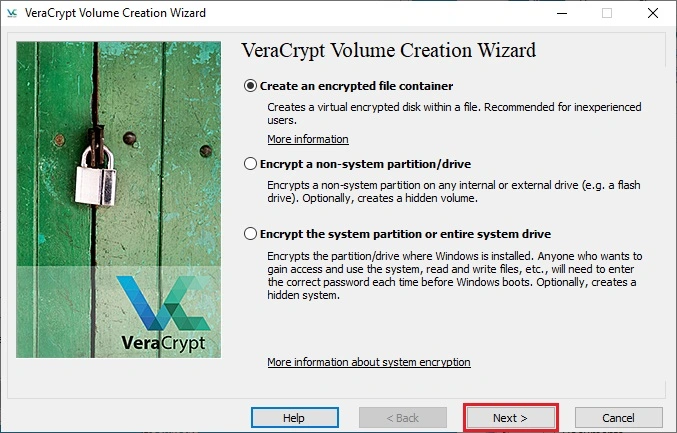
- Create an encrypted file container: This creates a digital file that will encrypt your data. This is the default option.
- Encrypt a non-system partition/drive: If you need to encrypt portable storage, select this option.
- Encrypt a non-system partition/drive: (Windows only) VeraCrypt is capable of operating as a substitute to Bitlocker. However, with the system requirements of Windows 11, this is not recommended.
Encrypting your Windows installation is not recommended. It is easier and less hassle to use Bitlocker or follow a guide to enable it for free on Windows Home
- Using VeraCrypt has a major downside of going through various hoops to enable Secure Boot and signing the VeraCrypt bootloader.
- Sometimes Windows Update will delete the VeraCrypt bootloader and you will need to use the VeraCrypt Rescue Disk to unlock your system and reinstall the bootloader.
Hidden Volumes:
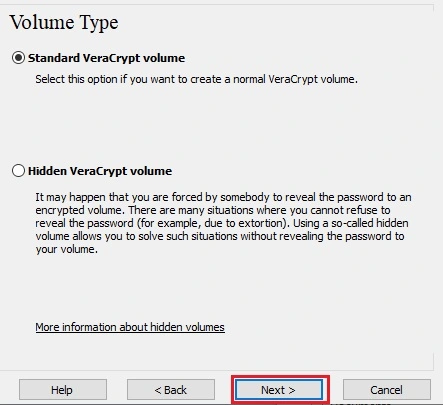
Volume type:
 1) Normal
 2) Hidden
Select [1]: 1
A standard or normal VeraCrypt container is a file that houses all of your data. A hidden file creates another section within that file that can be opened with a second passphrase.
Despite what the command-line menu says, it’s much more intuitive to use the GUI to create a hidden volume. Using the command line requires you to create a normal VeraCrypt volume with no filesystem, then modify it after the fact.

Hidden volumes can also store decoy files. In the event you are forced to reveal the contents of the VeraCrypt container, these files can be used to placate or mislead people.
Hidden volumes require a lot of maintanance. Your operating system has the potential to reveal the presence of a hidden volume through things like file caching and “recent files” menus.
If you chose to use a hidden volume, especially if you regularly store files inside it, you need to have the discipline to update the files inside the outer volume regularly as well.
Your decoy files should be regularly updated to keep up the illusion they are valuable. Examples include financial information, journals, or photos.
If you aren’t prepared for this kind of maintenance, it is for extreme threat models. Most people shouldn’t have to resort to this and it reduces your overall storage for valuable files.
Using a hidden volume by default could result in data loss unless specific mounting options are checked. By default, your hidden volume files will be deleted to free up space for the outer volume, so give the illusion it is a normal container. Better safe than sorry!
Volume Location

Enter the location where you want to store the file. If you use the command-line, this must be an absolute path.
Enter volume path: /home/user/Documents/test.hc
Encryption Algorithms
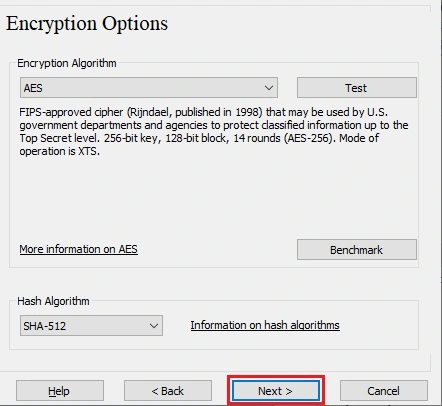
VeraCrypt comes with various standard encryption algorithms. Most people should just stick with the default settings.
Encryption Algorithm:
 1) AES
 2) Serpent
 3) Twofish
 4) Camellia
 5) Kuznyechik
 6) AES(Twofish)
 7) AES(Twofish(Serpent))
 8) Camellia(Kuznyechik)
 9) Camellia(Serpent)
 10) Kuznyechik(AES)
 11) Kuznyechik(Serpent(Camellia))
 12) Kuznyechik(Twofish)
 13) Serpent(AES)
 14) Serpent(Twofish(AES))
 15) Twofish(Serpent)
Select [1]: 1

Hash algorithm:
 1) SHA-512
 2) Whirlpool
 3) BLAKE2s-256
 4) SHA-256
 5) Streebog
Select [1]: 1
A warning for the command-line, the order is the swapped between the encryption algorithms and the volume size. Consistency!
Volume Size
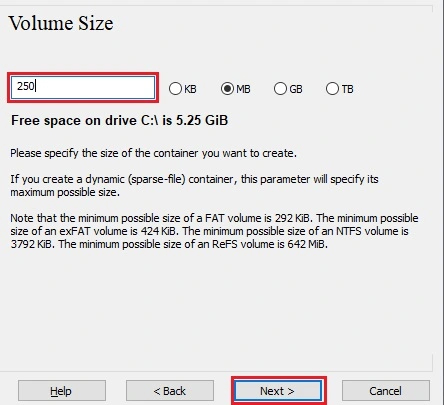
Specify how big you want your volume to be. If you are using a hidden volume, you will need to allocate space for the decoy files in addition to your hidden files.
Enter volume size (sizeK/size[M]/sizeG.sizeT/max): 1M
As another knock on inconsistency, you will be prompted to pick your volume format here.
Volume Password
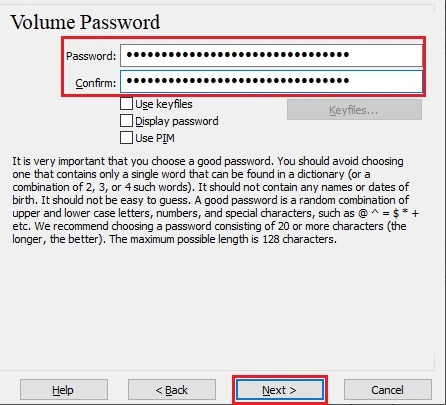
Enter a strong passphrase to protect your volume.
PIM
 Personal Iterations Multiplier (PIM) is a
value that will run an algorithm for multiple iterations. For extreme
threat models, volumes will mount slower, but the more the algorithm is
run, the more secure your data is.
Personal Iterations Multiplier (PIM) is a
value that will run an algorithm for multiple iterations. For extreme
threat models, volumes will mount slower, but the more the algorithm is
run, the more secure your data is.
Normal users can leave this at its default setting.
Keyfiles
 In addition to a password, keyfiles can be
added as another file required to unlock your volume in addition to a
password.
In addition to a password, keyfiles can be
added as another file required to unlock your volume in addition to a
password.
You can add file paths to any file you want or have VeraCrypt generate a keyfile for you.
Enter keyfile path [none]: /var/home/user/like.txt
Enter keyfile path [none]: /var/home/user/subscribe.txt
Enter keyfile path [finish]:
It’s imperative you backup and store your keyfiles in a safe place. If you cannot access them, you will lose access to the data within a VeraCrypt volume.
By default, no keyfiles are used.
Volume Format
Filesystem:
 1) None
 2) FAT
 3) Linux Ext2
 4) Linux Ext3
 5) Linux Ext4
 6) NTFS
 7) exFAT
Select [2]:
Formatting your container dictates where your container can be shared or what kind of files can be stored inside. In general, using these filesystems outside of VeraCrypt is the same.
- Ext: One of the oldest file formats on Linux. Do not pick the other options, just pick Ext4. Can only be opened on Linux.
- FAT: A filesystem universally supported across Windows, Mac, and Linux. Maximum of 4 GB per file.
- Mac OS Extended (APFS): The macOS filesystem. It can store files larger than 4 GB, but is only supported on macOS. Some Linux distributions like Kali Linux come with a driver called apfs-fuse to read it, but Windows cannot open it.
- NTFS: The Windows filesystem. It can store files larger than 4 GB and decent support on Linux as well. However, macOS doesn’t behave well and often will not let you write files to it.
- exFAT: Yet another Windows filesystem. It can store files larger than 4 GB, but plays better with macOS. Works across Windows, Mac, and Linux.
- BTRFS: A newer Linux only file format with special repair functions.
- None: This option is only available in the command-line and used if you use hidden volumes. This will prompt you to create a hidden volume. The rest of the space will become the outer, decoy volume.
Finalizing Your Volume
Entropy
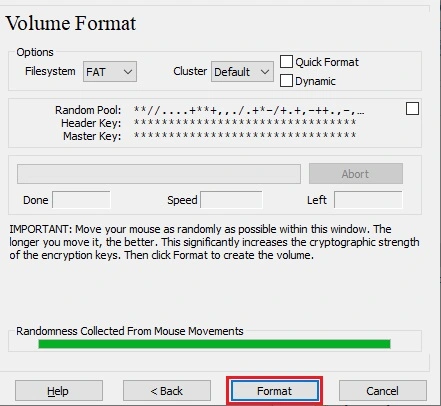
Once you have made it here, it’s time to collect some random noise. This further protects your VeraCrypt volume.
- In the GUI, you will be prompted to shake the mouse as randomly as possible within the window.
- In the command-line, you will be prompted to type 320 random characters on your keyboard, then hit Enter when you are done. If you still have characters remaining, you will be prompted to continue typing.
Click “Format” and then your volume will be created to specification.
Access Your VeraCrypt Volumes
Now that you have created your first volume, let’s open it.
Unlocking
GUI
Select a drive letter (Windows) or a number (macOS/Linux), then click “Mount.” Then a password prompt will appear. Enter all information relevant to your container.
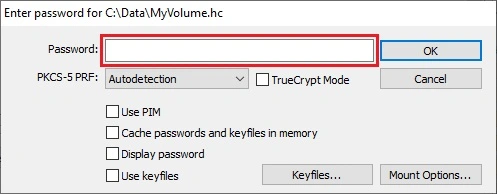
If you stuck with the default settings, they are the defaults here too. VeraCrypt will auto-detect which format your container is.
Command Line
To unlock a VeraCrypt volume, here are some sample commands:
# File
sudo veracrypt -t --mount /home/user/hitthebell.hc

# External Device (Linux, match letters)
sudo veracrypt -t --mount /dev/sda
After either option, you will be prompted to use your administrative password on macOS and Linux. On Windows, VeraCrypt is able to bypass UAC for admin users.
Once your volume has been unlocked, it can be accessed the same way you access a USB drive. Files can be interacted with in real time.
Dismounting
Similar to thumb drives, VeraCrypt has a procedure that needs to be followed to remove disks.
To dismount a VeraCrypt volume, select the volume you want to remove, click “Dismount” in the menu and enter an admin password.
sudo veracrypt -t -d /dev/sda
If you need to dismount multiple volumes, click “Dismount all”
sudo veracrypt -t -d
Updating VeraCrypt
VeraCrypt doesn’t have a mechanism to auto-update. Newer versions of VeraCrypt often fix issues or serious security vulnerabilities.
The only way to see if there is an update is to subscribe to the VeraCrypt GitHub releases. You can track VeraCrypt releases using an RSS feed, where you will repeat the installation process again once you are notified of a new release.
To follow VeraCrypt’s updates, add the following to your RSS feed reader:
https://github.com/veracrypt/veracrypt/releases.atom
Referenced:
- YouTube to insert server-side ads to break skipping sponsors and adblocking.
- The footage from the Snowden leaks is from Citizenfour (2014).
- “Come with me if you want to live” is from Terminator 2: Judgment Day (1991).
- xkcd 538: Security
- The clip shown at 29:18 is from Keijo!!!!!!!! Episode 2
Track Listing
- Kei Morimoto - Utopia
- The music for the sponsor segment is “Blizzard in DC” from the game Arctic Thunder. Heavily edited to remove the interposed America bits.
- yuhei komatsu - Bump!
- crepe (くれっぷ) - Fairy Lullaby (妖精の子守歌)
- crepe (くれっぷ) - Fairy Gift (妖精の贈り歌)
- yuhei komatsu - Scattered Sakura (桜が散る時)
- Outro: Khaim - Neon Lamp